Wednesday, February 29, 2012

Siding! More Plumbing, Electrical & HVAC - Week 16, Sunday

When we first got to the house this Sunday, we were a little disappointed that the front of the house had not changed much. It had been 5 days since our last visit and all we noticed was the new trim on the skirt. But, once we walked around the back, we saw that the back siding was underway!

Front with trim complete

Driveway (South) side trim
Front side
Garage with door closed
Detail of dining room window exterior

Here it is, our first glimpse of siding!
Sided & primed back of house!
North side of house
Trimmed, sided, primed & sealed window detail
After my family's last visit, my dad had some ideas for the front walk. The original front porch is cement with a impressed grid pattern. My dad's suggestion was to continue this same pattern through the front walk we are planning to add. It will come up the center of the lawn to steps directly in front of the front door. I think this plan will be a really nice addition to the house and make it much more inviting that walking up the driveway.

Front yard - future home of a center front walk
Front porch grid pattern


Here are some interior photos that show the final plumbing, electrical and HVAC details.

Master bath - tub
Master bath - shower (right) & toilet room (left)
Master bath - vanity plumbing for double sinks
Master bath - toilet room, or, the WC
HVAC, ceiling fan & can lighting in master bath
Upstairs bath
Washer & dryer plumbing in upstairs hall closet. This was a late add idea. Originally, we wanted to have a laundry shoot to the basement laundry room, but we realized there was no good home for it where it could function properly. This was an alternative solution that will allow us to add a washer and dryer upstairs at a later date if we get sick of the basement set-up.
Stairwell landing
Main level - front door
Close up of the fireplace built-in cabinet doors - these will be refinished at a later date
Close up of the dining room built-ins
Basement
Basement with bar plumbing

Tuesday, February 28, 2012

A Kitchen Issue: Window vs. Cabinet - Week 16, Sunday

As the rooms are becoming defined within the house, it is now easier to analyze the layout and visualize the spaces. We have been spending more time walking around the house and discussing the placement of cabinets, doors, walls, lighting etc. One issue we discovered was the lack of overhead cabinets in the kitchen. Originally, I didn't see this as an issue because we were going to have uppers next to the range. Because we chose to go with a double wall oven, these were eliminated from the design. Currently the kitchen has 3 windows along the side wall, 2 windows along the back and a set of french doors next to them. (see below)

Upon our last visit to the house, Oliver met us to discuss some options of how to fix this problem. We tried brainstorming various different solutions on how to have good glassware storage without upper cabinets as well as other places we could put them. Oliver's suggestion was to remove the far left window (of the 3 on the side wall). We saw that as a last resort because we really didn't want to loose any of the integrity of the design or a light source. He also told us about one of the trends right now in kitchen design of putting everything in drawers. Plates, glasses, pots, everything! To keep things orderly and from breaking, there are little rubber dividers inside. Sounds cool, but I just can't do it! When I want a glass of water, I want to open a cabinet to get the glass...

We took a night to sleep on it and consider our options. As soon as we got home, I hopped on Houzz for my daily dose of interior design and found this photo. It was a sign from the Internet Gods! A corner kitchen with 4 windows, exactly what we were considering! It looked much nicer than I thought it would so we decided to go with Oliver on this one.
Kitchen windows - Bye, bye window, the piece of plywood marks the one we are removing.
Kitchen - yellow marks are the placements of the the lighting and island.
Please ignore our lovely substitute doors. The real ones will be all glass :)
This week the window will be removed. It truly is the best way to have traditional storage for our glasses by the sink. I think there will be plenty of light with the 4 windows and two glass french doors.

Monday, February 27, 2012

Lighting Placements & Tile Inspiration - Week 16, Tuesday

Today we met with Oliver and the electrician to chose the location of all the ceiling and wall lighting. I was a little nervous about this meeting because I don't know the first thing about where an appropriate light placement is. I've never had that option (besides table/floor lamps) before! Oliver was very good at explaining why and where things should go though and we picked all the placements very quickly. I think we will have a good mix of 4" & 6" can lights to cover the areas that will not have an overhead feature light or sconce.

Here is a quick rundown what we ended up doing:
Bedrooms: a ceiling light in the center of the room and cans in the closets.
Bathrooms: can lights over the showers/tubs and wall lights over the vanities. The master bath got a couple additional can lights as well because it is quite large. I would have loved to have a chandelier over the tub or in the master closet, but apparently it's illegal! I was surprised to hear this because many of the designer inspiration photos I have seen have them. Sneaky sneaky....maybe this can be a "after-market" item....
Stairwell: a couple sconces in each upstairs & basement hallway and a ceiling light mount in the center of the upstairs stairwell. It's a 2-story ceiling in this stairwell area so Riley and I are on the lookout for a cool statement piece to put here. Something unique, modern and artsy would be really cool here.
Living room: a center ceiling-mount light, a few adjustable 4" cans to shine on the built-ins
Dining room: a center ceiling-mount light and two wall-mount sconces over the built-ins. That's where I hope to use the lamp shade pictured below.  There is a set of two that belonged to the house my Grammie was born in Jerome, Idaho. The house was built around 1915, and they were original to the home. Very cool to take a piece of family history and use it in our own house :) They are solid brass with pink marble glass. I'm going to have fixtures built for them locally. I got a quote for about $50 at Hippo Hardware to "sconcify" them. Not sure if I am going to change the glass or not. I'm not really a pink person, but they are pretty cool.
Kitchen: can lights in the ceiling, 3 pendant mounts over the island, and under-cabinet lighting where appropriate
Basement: pretty much all can lights. We want to keep it as light and bright as possible down here. Also we don't want to sacrifice any of that valuable ceiling height!

With all the "guts" going into the house, Oliver encouraged me after our meeting to start thinking about surface finishes. First on the list is tile. I have developed an addiction finding inspiration any and everywhere. My current favorite site to collect images on is Houzz.com. It's a really cool site where you can place images from other users into ideaboards that you manage and create. Very much like Pinterest for home design.Here is a link to my ideaboards if you are interested in seeing the design ideas I like for the house.

Around town there are a TON of tile showrooms. Two of the most famous being Ann Sacks and Pratt & Larson. After viewing Ann Sacks online, I knew that it would be a place to solely look for inspiration. Their product is amazingly beautiful, but priced accordingly. Maybe a source for a small backsplash? 
I decided to give Pratt & Larson a visit. They have a similar price point to AS, but they also have some more affordable options and a bargain/outlet room. 

Here are some photos of tile that I really liked from Pratt & Larson:


This could be neat for a bathroom floor - 1920's traditional with a twist

Craftsman style

Very 1920's - I don't think this quite goes in our house, but I like it.

Traditional Black & White hex tile

Simple 1" Hex tile

Nice diamond pattern in hex floor

White subway tile dark grout - will definitely use this in at least one bathroom

Calacatta marble hex - I love this!
Apparently it's one of the most expensive marbles though...

More marble - I like the combination of sizes for the top tiles

Marble hex tile inlay with rectangle surround & trim - This would be ideal for the master bath flooring

Marble showroom display - Just plain cute!

Close up of the above walls

1" Carrara marble hex tile under the pedestal sink & extra-large basketweave floor

Close up of basketweave - I love the scale of this.

Close up of hex tile 
Fun pattern porcelain - Riley will probably hate this, bit I like it :)

Plus tile - modern pattern with a soft palette
I didn't see anything I can't live without, but I did get a lot of ideas of how to combine different tile patterns. I also decided that I have to have some Carrera hex tile somewhere. It's so elegant, but it can take on a modern look when paired with the right things. 

More to come soon...I'm sure this just one of many tile inspiration trips I will be taking!

Exterior Wrap, Trim & Gutters - Week 16, Monday

Here are the first photos after returning from from Riley's work trip in Germany & Switzerland. As you will see, the exterior has taken on a new skin. The outside walls are now wrapped in preparation for the siding to go on. The gutters have also been attached and the primed trim is on.

Front with wrap & trim mostly complete - as you can see, the team is working on the gutters

Under roof paneling is almost fully installed
Substitute front door all trimmed out

Driveway side of house
Detail of trim around dining room windows 
Service box - no more hole here!
Back corner, dryer vents at bottom right
Back of the house with primed trim & substitute doors

Marveling at the 2-car garage!
Garage w/man door, primed & installed
Inside the house, the plumbing is almost complete and the tubs are in! The basic electrical is roughed in as well and cable, CAT5 & CAT6 will go in next. We also will be having a meeting shortly with Oliver and the electrician to set the location of the ceiling/wall lights. We will be doing a combination of traditional lighting as well as can lights to keep everything clean & bright.

Upstairs Master Suite:
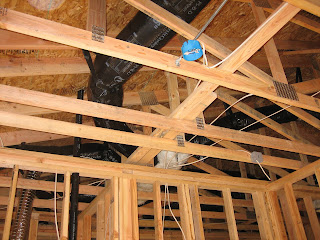
Master Bedroom ceiling - the little blue circle is the ceiling light connection
Master Shower - basic plumbing for 2 shower heads
Master tub - pretty excited about this tub!
 It's 6' and deep enough for a tall man, such as my husband, to take a nice soak.
Upstairs Guest Bath:
View into guest bathroom from master bedroom
- won't have this view for long!
Shower plumbing

Cast iron tub in place

Main Level:
Powder bath plumbing started - the red tube is going to be the placement of the vanity/sink

Powder bath - HVAC

Kitchen - basic sink plumbing under the center window on the left side wall

Kitchen - future home of the Refrigerator, Double Wall Ovens & Cooktop/Hood
Basement:
All kinds of stuff going on in these walls...

Utility Room - installed HVAC/Gas Furnace

Storage Room - electrical panel is in (back) & bar plumbing is roughed in (front)

Entertainment area